FAFSA 2024: 4 Recurring Frustrations and How to Fix Them
The FAFSA application process is a critical step for students and families seeking federal student aid. However, the FAFSA 2024 rollout has brought its fair share of frustrations. From delays in application processing to navigating the new form, applicants have encountered numerous challenges. In this blog, we will explore the recurring frustrations of the FAFSA 2024 rollout and provide helpful solutions to address these issues. By understanding the obstacles and knowing how to overcome them, students can maximize their financial aid opportunities and ensure a smooth application process. Let’s dive in and explore the four recurring frustrations of FAFSA 2024 and how to fix them.
Understanding the FAFSA 2024 Rollout Issues
The FAFSA 2024 rollout has not been without problems. Applicants who submitted their applications during the soft launch period encountered delays in processing, causing frustration and anxiety. The introduction of the new FAFSA form also presented challenges, as applicants had to familiarize themselves with the changes and adjust their approach to the process.
The Impact of FAFSA Delays on Families and Colleges
The delays in FAFSA processing due to the 2024 rollout could have a significant impact on both families and colleges. Families relying on financial aid to fund their education may feel like they are in limbo right now waiting for schools to receive their FAFSA and generate financial aid packages. It causes added anxiety and difficulties in planning for college expenses.
Similarly, colleges are also rewriting their financial aid timeline and strategy “on the fly” this year. Financial aid deadlines for families to submit forms may still be up in the air until FAFSA forms are processed by the Department of Education and sent to the schools. Timelines will be shorter and deadlines may be sooner than both families and schools are used to working with. The key takeaway here – establish a frequent line of communication between you and the financial aid offices.
Steps For FAFSA Completion & Submission
To alleviate possible frustrations associated with the new FAFSA, we’ve put together the desired “order of operations” that has helped families have the most success tackling the form. Jera Barrett, College Aid Pro’s Operations Manager has years of experience guiding families through their FAFSA forms. She’s seen all sorts of quirks, glitches, and problems over the years, but this year has had new challenges. After working through the current form, Ms. Barrett offered to share a work flow that has proven, in most cases, successful. Here are her steps:
- Create your FSA account – Applicants should obtain their FSA ID, which serves as their electronic signature and grants access to federal student aid information. This means that the student who is using the FAFSA for college and one parent or guardian should have an FSA ID.
The information you use to create your ID will be verified by the Social Security Administration before you can begin the FAFSA. This means that when you create your FSA ID make sure you use the information (name and social security number) that are on your social security card. If you aren’t sure, contact the social security administration for assistance. And know that you may have to wait a few days to get your FSA ID.
If you already have an FSA ID, because you are a student who has already submitted a FAFSA prior to this year, or you are a parent who has older children that you’ve submitted FAFSAs for, DO NOT create a new FSA ID. Use your existing account.
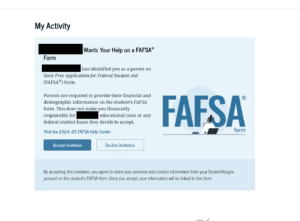
- Start with the Student Portion of the FAFSA – Have your student begin a new 2024-2025 FAFSA form here. Once they log in, they will be asked to invite any contributors to their form. Parents this is you! Your student will enter parent information including first and last name, date of birth, social security number, and email address. Then FAFSA will send an email to the invited parent that looks like this. Parents you may go ahead and accept this invitation, but DO NOT start your portion of the form yet.

- Complete, Sign, and Submit the Student Portion – Allow your student to continue with the student portion. Once your student has completed their portion, signed it, and submitted, you can move on to the parent portion.
- Begin Parent or “Contributor” Portion of the FAFSA – Parents, now it’s your turn! Go ahead and use the link in the email that invited you to contribute to your student’s FAFSA form to get started on your portion. You can also go straight to the FAFSA website to get started. Just make sure you click on “Access Existing Form” since your student has already started this process. To eliminate any confusion, remember that the FAFSA is considered your student’s form – not yours. You are simply contributing your financial information to your student’s form. This is why you are referred to as the contributor.
- Complete, Sign, and Submit the Parent Portion – Complete your portion of the FAFSA. Do not worry if you are not asked about assets. You may get some sort of verification form later in the year from individual colleges asking for more information about your family. Once you submit your form you should see that it is “In Review.” This will be your status until it is processed.

- Have Student Check their Email – Once both student and parent portions are submitted, and you see the following screen showing that your FAFSA is “In Review” check the email address that your student used for the FAFSA. They should receive an email containing your SAI. This email WILL NOT go to the parent’s email address because this is considered the student’s form.
- Wait – Congratulations! If you’ve successfully made it to this step without any problems, you’ve submitted your 2024-2025 FAFSA. Now you wait. No FAFSA forms will be processed by the FSA until at least the end of January. If you are concerned with financial aid deadlines or scholarship deadlines, we recommend that you take a screenshot showing that your FAFSA has been submitted and is officially in review. Make sure you capture the time/date stamp. You can share that with financial aid offices, scholarship committees, and admissions offices if necessary. Remember, at this point it’s important to communicate regularly.
Common Problems & Frustrations
We know many of you tried the above format and it didn’t work. First off, we know that can cause frustration, so take a deep breath. We’re going to walk through some of the problems we’ve come across and some possible solutions. If these suggestions don’t work for you, you can always reach out to the FAFSA help line, or sit tight until the end of the month when processing begins. Our hope is that some of these problems with automatically get resolved at that time without any additional work on your part.
1. I can’t create an FSA ID
Our first suggestion is make sure all your information matches with what the social security administration has on file. This means, you must use the name and social security number that is on your social security card, not just the name on your birth certificate. If you’ve changed your first or last name and haven’t updated it with the SSA, you will have problems.
If your personal details are correct, go in and try deleting information and re-entering it. Sounds silly, but we’ve had success with it! Also, check and make sure you don’t have extra spaces in between words.
2. Problems with signatures
This has been a BIG issue for many families. Here’s a few ways we’ve seen this happen.
-
- You signed the form, but the FAFSA says you can’t submit the form because you or your student haven’t. You get into a loop of trying to get into your form and double check, but you can’t.
- You don’t even get the option to sign
- The FAFSA notifies you that your form has been submitted but one of you haven’t signed it yet.
Here are few ways work arounds we’ve tried.
-
- Try removing a school from your list, and adding it back in. This sometimes forces the system to let you back in.
- If you are signing the form and it won’t let you submit, instead of hitting cancel, try hitting continue.
- Log out and log back in.
These don’t work for everyone. If you were unsuccessful, like we said earlier, hold on until the end of the month. You can still take screenshots if you’re concerned about deadlines.
3. I’m married filing jointly and it’s asking for my spouse’s information. I thought only one parent needed an FSA ID!
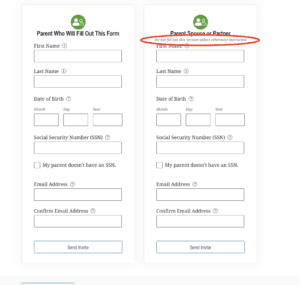
This one is a bit tricky and can cause a problem if your student doesn’t invite contributors correctly. Your student is asked about parent status. If they choose married, they will move to this screen.

At first glance, you think, sure, I’ve got 2 parents so I’ll fill out the information for both of them. DON’T!!
Fill out the first column for the parent who is going to act as the contributor. This doesn’t have to be the parent who has the job or gets paid the most. It’s just the parent who knows all the information to complete the FAFSA.
Before you fill out the second column, look at the text that is circle in red above. It says, “Do not fill out this section unless otherwise instructed.” Most students are not going to read this fine print, so please make sure your student knows to only enter one parent’s information on this page. Unless FAFSA has notified you, do not fill this out.
If your student has already entered this and you’re spouse receives a notification that his/her information is necessary, then go ahead and continue. Your spouse will not have to create an FSA ID. We’ve found that the information is used for verifying purposes and matching it to the IRS information that is pulled for your FAFSA application.
4. I wasn’t asked about any assets.
Lucky for you, this isn’t a problem you need to worry about, at least not right now. Remember, when you began filling out your portion you agreed to have the FAFSA pull your 2022 tax information from the IRS. This is a new standard practice for the FAFSA for most circumstances. This means that you may not have to report your assets based on the calculations already done in your profile. Now, you may be thinking that you don’t meet the required reasons to NOT report your assets. If that’s the case, don’t worry, you’ll be asked to report them at a later date, possibly through school financial aid offices.
Have You Tried Unplugging It?
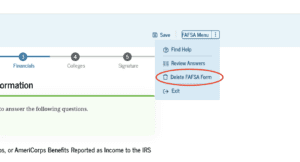
Our final solution for FAFSA frustration – when you are “done.” Much like when the TV doesn’t work or your computer is acting up, try unplugging it and plugging it back in. Yes, you can do this with the FAFSA. You can delete your form and start over completely. If you are running into a lot of issues you can start from scratch again.
You’ll find this option under the FAFSA menu on the right side of you screen.

In conclusion, navigating the FAFSA right now may create some headaches, but know it’s a work in progress. If your struggling and the above tips and suggestions aren’t helping you can reach out to your school financial aid office or schedule an hour with one of our experts at College Aid Pro. While this may not feel like a simpler, easier FAFSA right now, it will get better. Check back on your form at the end of the month, connect with school financial aid offices to update them on your progress or problems, and be patient. We’ll keep you up to date with late breaking information as we get it.


